Blog Flux MapStats: Stats and Web Counter
]]>
Google
 
Web ringbling.blogspot.com

Saturday, September 24, 2005 

Pattern 1 - Wire, Jump Ring, and Carnelian Beads - Heart-Shaped Pendant

design01.jpg


Here's the first pattern out of my sketchbook. As I said in the last post, I have a number of recent pendant and brooch jewelry designs that were influenced by a wire-working book published in 1917. The original version of the sketch above was a bit more detailed, but I'm using a new sketch tablet and I couldn't quite get the hang of it. But choose the right materials, especially for the beads, and you'll have a lovely heart-shaped pendant.

As I haven't actually made the above item, I can't give you exact details. However, I'm suggesting the following materials (get extra, just in case):
  1. Carnelian beads with a hole drilled through two sides. Don't go by the number in the diagram above. You may need more if you're using small beads.
  2. 6 jump-rings of about 6-8 mm. These are the visible circles above.
  3. 8 jump-rings of about 3-4 mm. These are the double vertical lines joining the large jump-rings.
  4. Thick silver wire or silver-plated wire, probably 12, 14 or 16 gauge. This wire forms the skeleton of the heart shape and must be able to hold its shape.
  5. Two long strands of thin silver or silver-plated wire, plus a few bits for the two dangling beads at the bottom of the pendant. You might actually need a long head pin to attach the bottom two beads to the bottom vertex of the heart shape. Experiment to be sure.
  6. You will either need wire or chain to attach to either side of the topmost large jump-ring.
Start by forming a symmetric heart-shaped skeleton with the thick gauge wire and twist together at the top - but do something attractive to the top, or wind it onto the top of the 4th large jump-ring from the top. I think you can figure out how to attach the jump-rings. The first piece of thin wire will string all of the carnelian beads together, and will attach to the third jump-ring from the top, as well as the heart skeleton. The second piece of thin wire will be wound around the skeleton but over the thin wire between each bead. This will hold the beads in place. My guess is that unless you're an experienced designer, you may need to try a couple of times before you get this pendant. But I do know enough about wirework to know that the above pendant can be made. Just make sure you have enough thin gauge wire.

Feel free to use this pattern. If you reprint the pattern and/or the instructions, please give me credit.

(c) Copyright 2005-present, Raj Kumar Dash, http://ringbling.blogspot.com

Technorati : , , , , ,


Are You A Jewelry Maker/Designer? Here's A Possible Income Opportunity

The Public Domain: How to Find & Use Copyright-Free Writings, Music, Art & MoreIf you're a jewelry maker or designer and you're running a website or a blog, here's a little-known potential source of income: repackaging public domain books. As an "Internet Solutions" consultant, it's my business to learn about all manner of opportunities for earning income on the web. One such opportunity is taking books whose copyright has expired (usually so if they are published before 1937), rearranging the text and graphics, then republishing it under a new copyright, usually as an e-book (electronic book).

After I found about how popular this activity has become, I went to my local university library and signed out a couple of books from the early 1910s. Now I have not yet verified with the United States Copyright office whether the books I have had their copyright expire, but it is very likely since they were published before 1937. However, only one of these books is worth the effort of repackaging. It has some incredible instructions for wireworking that I have yet to see in any modern day book.

The book title is "Jewelry Making And Design" and is written by Augustus F. Rose and Antonio Cirino, B.S. The book was originally published by Metal Crafts Publishing Co., Providence, R.I. (United States) in 1917. Now I just don't have the time to repackage this book, and don't want to spend time verifying its copyright status, but you're welcome to do it. Just a word of caution: Dover Publishing republished this book a couple of times, in around 1922 and 1937. Don't repackage their copies: their copyright has likely not expired. Get the original edition. [In future posts, I will provide links to some e-newsletters that offer information about the public domain.]

While I'm not repackaging this book, what I have done is made several pages of sketches of original wire, bead and jump-ring jewelry designs that are highly influenced by the wonderfully detailed instructions in the book. The result, of course, is that my designs look like they were from the early part of the last century. And wirework is such that there is always someone who will like it. There's something about creations of twisted wire that appeal to people. And if you are already selling your work at weekend markets, you may want to add some new creations to your repertoire.

That said, I'll be posting all of my designs here. Feel free to use them as you will. Just forgive me for the time between postings, as I have to re-sketch numerous designs digitally with a sketch tablet, then manipulate them in graphics software to clean them up. I'll try to post at least one per week, probably on Monday or Tuesday nights. Once I have all of the sketches complete, I'll compile them into a PDF file and post that here as well. You can use any or all of the designs, but if you republish the actual sketches, you'll need to give me copyright credit. Stay tuned.

(c) Copyright 2005-present, Raj Kumar Dash, http://ringbling.blogspot.com

Technorati : , , , , , , , ,


Friday, September 23, 2005 

More Wire/Jump-Ring Jewelry Patterns Coming Soon

Amulets of Ancient Egypt I've been a bit preoccupied with other blogs and other projects, so I haven't posted here very often. What I am planning to do is transfer several dozen designs that I've sketched out in pencil, pen and ink into digital form and show them here. I've been researching into classic wire jewelry right back into ancient Egyptian times, including the methods of producing jump-rings. Many of my designs from a few years ago were influenced by Egyptian work. More recently this year, several of my designs are predominantly wire-based rather than jump-ring based. If you readers do not find it objectionable, I'll post my sketches in the near future, at a rate of about 1 per week. In the meantime, if you haven't already done so, go check out my favourite resource site, Maille Artisans.

By the way, this blog will be moving to another web server in the near future. A notice will be posted here when that happens.

(c) Copyright 2005-present, Raj Kumar Dash, http://ringbling.blogspot.com
Technorati : , , , , ,


Tuesday, September 13, 2005 

Simple Jump-Ring Project (PDF) - Double-Y Necklace

I've posted the first of a series of chainmaille/jump ring jewelry projects on my web server. Please help yourself. It is a very simple project designed to get you familiar in working with jump rings. The projects will get more complex and sophisticated as we go along. Which also means that I will not necessarily be posting free project details regularly. I will eventually start to cover some of the aspects of selling your chainmaille/ jump ring work, where to look for tools, references on how to make your own jump rings, and more. I do hope to eventually post here regularly.

(c) Copyright 2005-present, Raj Kumar Dash, http://ringbling.blogspot.com
Technorati
: , , , , ,


Wednesday, September 07, 2005 

Chainmaille/ Jump Ring Jewelry Basics - Part I - Tools and Basic Weaves PDF

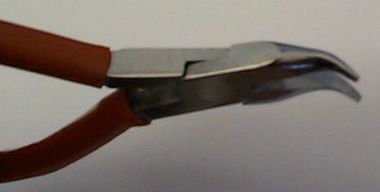
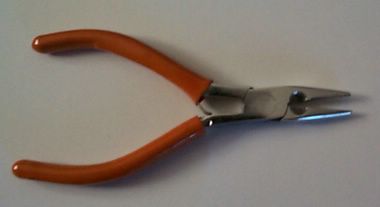
I tried in vain to photograph some pliers that I use for chainmail/jump ring work, but my digital camera wasn't cooperating. Then I tried to photograph some of my jump ring jewelry pieces, and no matter how hard I tried, nothing worked. So you'll have to bear with me while I spank my camera for being naughty. (It's not my fault, right :) The best I could do for shots of pliers to use are shown below.

Chain-Nose Pliers


Regular Pliers


I also have a free "basic chainmaille" weaves tutorial in PDF format. Help yourself. I haven't had any feedback on this tutorial, as it was designed for a magazine series that didn't get published due to space concerns. If you find it difficult to follow, please post a comment on this blog or sned me an email.

(c) Copyright 2005-present, Raj Kumar Dash, http://ringbling.blogspot.com

Tuesday, September 06, 2005 

Another Example of Japanese Maille (Chainmail) with Dangles and Glass Beads


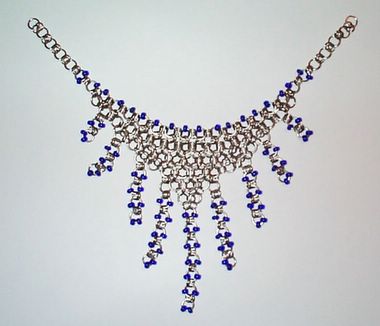
Above is another example of Japanese maille mixed with other jump ring weaves. All it needs for finishing is some form of clasp: lobster, s-hook, etc. Typically, Japanese maille is supposed to have two different jump ring sizes to form the triangular portion. I've used only size, to get a different effect. I've also added a row of blue glass beads across the top of the triangular portion, then added dangles with beads at spaced intervals from the bottom of the triangle. Instructions on making this piece will appear here soon.

(c) Copyright 2005-present, Raj Kumar Dash, http://ringbling.blogspot.com
Posted by Picasa


Saturday, September 03, 2005 

Chainmail/ Jump Ring Jewelry - The Tools of the Trade


The tools of the trade for chainmail can be as minimal as two pairs of pliers and a tray, or as complex as jigs, vice grips, circular saws, and more, especially if you want to make your own jump rings. (This is very cost effective if you do a lot of jump-ring work.) As I do not have a workshop set up yet, I rely on pre-made jump-rings, I only use 2-3 types of pliers: needlenose, bent nose, and for more complex work, something to snip wire with.

A good a set of jewelry pliers is highly recommended, but for my early work, I bought a set from a local hardware store. The reason you want jewelry pliers is because they are better suited for jump ring and other jewelry work, and hurt the hands less after many consecutive hours of working. I will often work for 6-8 hours, after which time my hands will be aching. If you have pliers that are too small in length, get rid of them. The proper length is important to save you from hand problems later (most especially Metacarpal Tunnel Syndrome).

Beyond two good pairs of pliers, all you really need to get started are jump rings. The large hobby shops often have them, but their stock is often packaged in the most ridiculously small quantities at stupid prices. If you are going to do serious work, buy in bulk. That means you'll have to search out a "bead crafts" store. In the United States, these kinds of stores are abundant. Up here in Canada, there aren't as many, and it's often hard for me to get any work done. I'd have to order by credit card, but I don't use them anymore. (Many stores will give you a discount for cash, or alternatively, add a surplus for credit cards.) For example, a Japanese maille necklace, shown above, can take up to 300-600 jump rings of 2-3 sizes, depending on the precise style and whether you add "dangles" or not. You can reduce this quantity by replacing some of the rings with colored glass beads.

(c) Copyright 2005-present, Raj Kumar Dash, http://ringbling.blogspot.com
Posted by Picasa


Thursday, September 01, 2005 

RingBling - Chainmail/Jump Ring Jewelry Designs and Technique

About seven years ago, in the midst of one of several unemployed periods in my life, I somehow fell into making jewelry to pass the time. The form I focused on was jump-ring jewellry, also known as chain mail or chain maille. The reason I picked working with jump-rings was that I found it incredibly peaceful and even meditative. When I got better at it, I could even do it while watching TV. Doing two things at once is always a bonus :D, but apparently the activity masages several acupuncture points in human hands. I found other types of jewelry-making rather frustrating. Jump ring work relaxed me. What's more, I found that despite the connotation of chainmail and war/battle, I could design many beautiful pieces that someone with no interest in battlegear might wear.

Over the years, I dabbled in jump-ring jewelry, never quite committing until a couple of years ago. But I moved back to my small hometown a year ago, and getting materials is extremely difficult. (I don't use credit cards.) I've actually had to turn down some orders. That may be a mixed blessing. While my jump ring jewelry got many rave reviews and almost a profile in a wire jewelry magazine, I only ever sold a small handful. The more intricate pieces that I love to make are costly to make unless you buy materials in bulk quantities. They are also time-consuming. I spent 7-8 hrs over two days making my mother a birthday present of a "Japanese maille" necklace in gold rings and red glass beads. Half way through, I thought I'd run out of jump rings. I had to go searching for more gold-coloured rings. Not being able to find them in the right size and the right color tone, I had to modify the design. After I presented it, however, my mother told me that I should have made it with green beads. (I had to laugh, as all I'd ever seen in her collection was gold and red, with the occasional blue. Never gold and green.)

Jump-ring jewelry making is something that you get faster at with much practice and the right tools. The right set of pliers make an enormous difference. I work with three pairs of pliers, with one pair in each hand at the same time. With much practice, some of the chainmail bracelets I made went from taking 1.5 hours to 45 minutes.

Nevertheless, with my time divided up over several different pursuits, I've recently had to focus only on jump ring and chainmail designs. In addition to the designs of several years ago, I've sketched out over a hundred designs in the past year. With the popularity of movies like Lord of the Rings and other fantastical epics and battle films, chainmail has enjoyed a fair bit of popularity itself recently. So I thought I'd take advantage of the current popularity of chainmail and post a few of my designs, complete with instructions, free of charge. Basic ideas will be presented here. More detailed instructions will be posted at my very ugly, unfinished website, Wire Genius (which is really just a redirect to my consulting website, in case you notice the browser status bar).

By the way, there are several dozen great jump ring/chainmail websites, many of which will be mentioned here eventually. I unfortunately lost my Mozilla browser bookmarks when my computer crashed for the umpteenth time yesterday. You'd think I'd learn...

(c) Copyright 2005-present, Raj Kumar Dash, http://ringbling.blogspot.com


About me

  • I'm blogslinger
  • From Canada
  • Writer, author, former magazine editor and publisher, amateur photog, amateur composer, online writer/ blogger, online publisher, freelancer

  • My profile


Powered for Blogger
by Blogger Templates